

In the instructions below, substitute your UW Net ID wherever you see "uwnetid".
Last updated: 5 Aug 2020
Virtual Computing Lab (VCL) Overview
A virtual computing lab (VCL) is a pool of remote computers available for use by authorized users. While a real computer lab consists of computers that can be used by any authorized person, one must go to the lab room to use the computers. Computers in a virtual computing lab are accessed remotely via the internet. This means that as long as you have access to another networked computer and are provided information on how to access the remote computer, you don't have to go to a room to use a computer and the applications it runs. You may use your personal laptop, smartphone, or home desktop computer... or a classroom, lab, office, public library, or conference computer. The only software required on those networked computers is remote desktop software:
- Windows — Remote Desktop Connection Client, included in most modern Windows
operating systems as mstsc.exe
If you don't see it listed in Start/Programs/Accessories, then select Start/Run and enter:
mstsc
- Mac OS X — Microsoft has a native Remote Desktop Connection Client for Mac download
- Mac OS X open-source — CoRD
- Unix-like — freerdp
A long-term goal of the SET's VCL is to allow reuse of these computers by many people in the same day, similar to the reuse of a workstation in a real lab. Consequently, all VCL computers are available only for short periods of time during an academic quarter.
Most computers in a VCL are virtual machines (VMs), utilizing the multi-core power of today's real hardware. Combined with large amounts of RAM and fast disks, it is possible to host several VMs per real computer with acceptable performance. However, with special hardware, it is possible to control an entire real computer over the network, including powering it on and off and watching the entire process, for those tasks that require access to a real computer.
Features
Working from the comfort of your home using a wired or wireless network, outside on a warm, sunny day on a campus using a WiFi network and a laptop, while you telecommute using the cellular network, from a coffee shop, during breaks at a conference, or in a hotel room is very convenient. Commuting time and cost are saved, and the learning experience is much more pleasant when one doesn't have to conform to hours when a computer lab is open.
Other than location-independence, what does a VCL computer provide? It depends on the way it is implemented, and there are three phases to our VCL implementation plan:
- Phase I: preconfigured, dedicated VCL computers (VMs) with full administrator privileges
- Phase II: ability to reserve VCL computers (VMs) and specify applications to be ready to use during the reserved time
- Phase III: ability to reserve VCL "bare metal" hardware and modify virtual machines, to install and configure operating systems, networks and applications
But it isn't all about reserving computers, it also is about controlling them. In typical computer labs, changes to the operating system and applications are not allowed, to provide each user with the same experience and to control the cost of maintaining the lab computers. With VCL computers, the control returns back to the user, as if you owned that computer and could do anything you wanted to do with it... if only for a short time (enough time to complete assignments and do projects).
Limitations of slow classroom, lab or personal computers may be removed by the use of modern computers in the VCL, but that speed advantage cannot be guaranteed for long. What might be more beneficial is that classroom computers don't need to be changed to satisfy new or changed computing needs of courses -- the VCL computers would still need to be changed.
Universities often enjoy "academic pricing" for software licenses, but with that pricing comes restrictions on where the software can be installed. Often, it can only be installed on university-owned equipment. This means that students and often faculty cannot install the software on their personal computers. The computers in the VCL, being owned by the university, satisfies this common licensing restriction.
With the eventual ability to modify virtual machines, comes the ability to create and modify a virtual network of virtual machines.
Limitations
There are some limitations as well. Your computing device needs to be attached to a network with access to the internet, and compatible remote desktop software must be installed on that device.
Performance is likely to be an issue, with such heavy reliance on the network, but basically, anything that is resource-intensive will have an impact. For example, graphics-intensive programs like video players and 3D modeling tools will be limited to the capabilities of either the VM or the network speed. Another example is moving large amounts of data, in the millions or billions of bytes, would tax the network so much that everyone using the VCL will be affected. Bandwidth limitations may need to be implemented in that case.
Usage
So how does one use a VCL computer? The mechanism will change from phase to phase.
Using Various Credentials
Note that there are several account or login names and passwords (i.e., "credentials") that are needed to successfully use a virtual computer. You will see
| Name | Credentials | Application to use | When to use | Why |
|---|---|---|---|---|
| cssgate credentials | UW Net ID and MyUW password | ssh terminal | to find VCL information | to communicate other credentials to you securely |
| remote desktop (RDP) service | guest OS account and its password | remote desktop client (e.g., mstsc in Windows) | to show the display of and interact with the remote computer | to ensure that only you can access the remote computer |
| secure shell (SSH) service | guest OS account and its password | ssh client (e.g., plink or ssh in Windows) | to show the terminal of and interact with the remote computer | to ensure that only you can access the remote computer |
| operating system (OS) login | administrator, itadmin or root account and its password | login screen of operating system | to login to the OS (e.g., Windows, Linux) | to secure access to the virtual computer and provide privileged and non-privileged users for the OS |
| application | depends on application | client application program | to securely access the application; especially a network application | to provide pre-configured credentials for applications installed by SET lab staff |
Finding Information About Your Virtual Computer(s)
As of 5 Aug 2020, after more than a decade of operation, the VCL is still in Phase I. That means that SET Lab staff preconfigure all virtual machines (VMs) or virtual computers (VCs) and the information is static. Therefore, all of the information can be found on your account on cssgate.insttech.washington.edu, in the ~/.vcl file.
You will need to know how to login to the repository server. The .vcl file is in your home directory (or the home directory of a team account).
Once logged into cssgate.insttech.washington.edu, an individual user can see the contents of her VCL information file by entering:
cat ~/.vcl
A member of a team would look at the team account's (e.g., _431team1) VCL information file. For example:
cd ~
cd ../_431team1
cat .vcl
Using the information in a .vcl file, you should be able to communicate with and among your virtual machines. Each line is stamped with the date and time, since we will append to this file in the future. That means you want to look for the most recent information (appearing nearest the end of the file), because it may have overridden any earlier information.
Example of a .vcl File
Here is an example of the main part of a .vcl file:
20100323 13:09:55 vcl user srondeau password 'hispassword'
20100323 13:09:55 -------- Host and Guest Login Information ----------

20100323 13:09:55 vcl host cn1-vcl4 '128.208.244.63' (host ip)
20100323 13:09:55 --------- Information for wxp ----------
20100323 13:09:55 | vcl vm wxp (login) itadmin password 'itspassword'
- The first line:
Immediately after the words vcl user is your UW Net ID (or team account name). After password, you will find that account's password (hispassword), surrounded by single quotes.
- The second line is the section name: "Host and Guest Login Information"
- The third line:
Immediately after the words vcl host, is the compute node's name (cn1-vcl4 above). A "compute node" is a real machine that may host more than one virtual machines. The information in quotes and followed by (host ip) is the host's IP address (128.208.244.63).
- The fourth line is the section name for the VM: "Information for wxp"
- The fifth line:
The virtual machine name (wxp above) appears immediately after the words vcl vm. After (login) comes the operating system login name (itadmin) so you can login to the guest operating system that the virtual machine runs. After password, you will find that account's password (itspassword, e.g.), surrounded by single quotes. These operating system login credentials may be different for each virtual machine owned by an individual or team.
A human-generated password will be recognizable as such and is case-sensitive, but it will not have any quotes in it and may contain zeroes and ones. On the other hand, an automatically-generated password is also case sensitive and somewhat pronounceable, and it will never have any kind of quotes in it, nor will the numerals zero or one appear, to avoid confusion with the valid letters capital "o" and lowercase "L" when certain fonts are used.
Here is an example of using the information above:
The account name and password are the credentials you use to manage your VC manually, via ssh'ing to the host's IP address. Using the .vcl file information above, entering:
ssh srondeau@128.208.244.63 start wxp
and providing the password hispassword would start srondeau's wxp VM on host 128.208.244.63.
Alternatively, using the graphical manage_vc app, the above command would done for srondeau when he clicked on the Start wxp button.
Sections of the .vcl File
- Host and Guest Login Information
- Information for VM
- Port Information
The first thing you need is your account name (UW Net ID or team) and password. This information is used implicitly by manage_vc or explicitly if you manage your virtual computers via ssh/plink.
After that, you need to know specifics about each VM, starting with the section named "Information for vm_name" (where "vm_name" is the actual name of the VM), and ending with "End of Information for vm_name").
There may be other lines in the ~/.vcl file corresponding to the same VM, usually for additional ports mapped to virtual Network Address Translation (NAT) devices attached to a virtual network interface card (NIC) or virtual machines. In the case of an additional NAT-mapped port, following the header of PORT Information each host/guest port is on its own line; e.g.:
20100403 10:54:37 +-------- PORT Information ----------
20100403 10:54:37 | vcl w2k8_web cn1-vcl4 host port '128.208.244.63:53820' for guest NIC 2 port 80/tcp
The second line records port information for the virtual machine called w2k8_web on compute node/host cn1-vcl4. If one wants to connect to the web service on the w2k8_web VM's second NIC (2), guest port 80 using the tcp protocol, use host port 53820 at IP address 128.208.244.63. That is, one would put this in the web address portion of a client browser on some other machine:
http://128.208.244.63:53820
You should see the home page being served by the virtual machine called w2k8_web, if the VM's web service is running, configured to use port 80, listening for connections from any computer, and the guest operating system's firewall is NOT blocking the port.
If your NIC used the bridged networking method (vs. NAT as described above) and the guest operating system configured the NIC with a public static or dynamic IP address, the web address would have been simpler (no port since the standard/default one is implied); e.g.:
http://128.208.244.129
Note that, when using NAT-attached NICs, in order to use client applications to access other guest ports on your remote VM, those client applications must provide a way of specifying the remote (host) port. For example, you would need to tell Visual Studio 2008 to use the specified host port, NOT the standard guest port 1433, to contact your remote SQL Server database server. The way to specify the port number may vary per application; many applications (like web browsers) use a colon (:) to separate the IP address from the port. SQL Server Management Studio uses a comma (,). Others may use a special property value or text box to provide the port number.
When creating VMs for you, SET Lab staff may use one NIC using the NAT networking method with multiple host ports on one public IP address instead of providing a NIC using the bridged networking method. The latter always requires one unique, public (routable) IP address to use the standard ports for each VM, and public IPv4 addresses are limited. In addition, using NAT-mapped ports provides an additional measure of security for a VM, as one can only use the non-standard ports we open.
Accessing the Virtual Computers
There are two ways of accessing (managing and connecting to) the virtual computers:
- using the graphical manager app, manage_vc from Windows
- using commands, where you copy and paste VCL information into an ssh command and/or your remote desktop client software
Accessing VCs using Graphical Manager
On a Windows client, you can download the graphical manager app, manage_vc.zip, unzip it, and use manage_vc to manage and access your virtual computers.
If you have installed, started and connected to the UW's Virtual Private Network (VPN) using the Husky OnNet VPN, you should be able to gain access to your virtual computers from any computer connected to the network. Otherwise, if using a home computer and Husky OnNet VPN is not connected, you can only remotely access your virtual machines/computers that are on hosts that have public IP addresses.
For our purposes, host IP addresses that start with 10., 172.28., or 172.22. are not public subnets, but private subnets, accessible only by being on a UW campus or using Husky OnNet VPN.
Stated another way, by using computers on any UW campus, you don't need Husky OnNet VPN to access the virtual computers.
Normally, you should be able to use manage_vc without any modifications. However, if you:
- want to manage a team account's VCL, or
- are working from a non-UW computer
you may need to modify the manage_vc.ini file, as follows:
- Locate the manage_vc.ini file where you unzipped the archive.
- Edit it using a text editor such as Notepad to:
- change the user account name to your UW Net Id, look for user line
and change its value (initially, an asterisk '*') to your UW Net Id.
For example, if your UW Net Id is johndoe, the line should be:
user = johndoe
- use a team account, look for the filename line
and replace its value with
the absolute path of the team's .vcl file
For example, for team account _431team3, the line would look like:
filename = /home/INSTTECH/_431team3/.vcl
Note that you would keep the user value as your UW Net Id.
- use a remote copy command other than PuTTY's, look for the line containing ssh and change its value to the full path to that command.
- change the user account name to your UW Net Id, look for user line
and change its value (initially, an asterisk '*') to your UW Net Id.
- Save the file.
Now you are ready to use manage_vc.
- Start manage_vc
The first time you use manage_vc, it will prompt for your MyUW password so that it can retrieve the information about the virtual computers. That information is in the .vcl file on your login account on cssgate.insttech.washington.edu and manage_vc will retrieve it for you after you enter your password and store it on the computer you are using (the "local computer"). After that first time, it will try to re-use any existing .vcl file stored on your local computer.
The .vcl files are stored in the user profile as files named .vcl.uwnetid for non-team accounts, and .vcl.teamacct for team accounts — substitute the UW Net Id you used for "uwnetid" or the team account name for "teamacct" in the file names.
- After successfully retrieving the desired .vcl file, manage_vc will show you a graphical interface with everything you need to manage your virtual computer(s).
- Use the tabs to get to different virtual computers if you have more than one. The name on each tab is the name of a virtual computer.
- Click on the "Connect" button to connect to the remote desktop
for that virtual computer.
Please read Displaying and Interacting with VCs. The "Connect" button works only with Remote Desktop Interaction.
The virtual computer must be started, and its guest operating system must be fully operational before you can use its RDP connection, if an RDP service is indeed present, running and waiting for connections from any remote computer. Most virtual computers provided by SET Lab staff will be set up this way.
- Some login passwords are very cryptic and hard to type.
That's why there is a button to
click to paste (or simply reveal) the guest operating system
account's password.
But when do you click on the button to paste a password? If you are logging in to the virtual computer, once you identify the user account to login to, the operating system prompts for a password. The cursor then should be in the password's text box -- you would normally type the password there. Instead of doing that, go to the manage_vc window and click on the Paste ... password button, and the password should be entered into the password prompt.
Displaying and Interacting with VCs
Some of guest login information is used for displaying and interacting with the remote desktop or console via one of these methods:
Once you can see your remote desktop/console, you will often need to login to the operating system there. There will be other lines of information for other purposes, to be described later.
Accessing VCs via Commands
This section links to using ssh to manage the VCs, using MacOS.
Please read Displaying and Interacting with VCs. What follows is how to get an RDP client (specifically, Microsoft Remote Desktop Connection Client) to connect to a running and properly configured RDP service on a Windows or Linux virtual computer, via a port-mapped NIC.
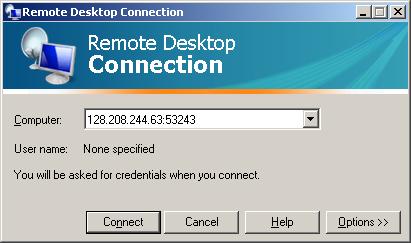
Now that you have found and probably copied to the clipboard the IP address and port specification (within the quotes) found in your .vcl file, you need to use it to access the display of your VM.
- Start the remote desktop client and
supply the ip:port
You use (e.g., paste from the clipboard) that 'ip:port' specification in remote desktop client; for example, in the Microsoft Remote Desktop Connection Client:
- Provide your credentials
To make sure no one else can use your virtual computer, you need to supply the user id and password for authentication. For the Microsoft Remote Desktop Connection client, click on the Options button and the General tab shows connection information:
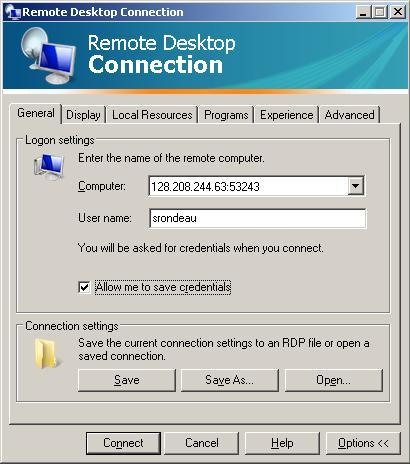
It would be a good idea to copy to the clipboard the guest login password within the single quotes, to have the password available to paste when requested.
- Save your credentials
Note that we also check Allow me to save credentials, which is fine for all non-public computers.
- Connect to the remote computer
Click on the Connect button.
You may see an error box containing a message that starts:
Your Remote Desktop session is about to end. This computer might be low on virtual memory...
It probably means that you did not click on the Options button and check the box before Allow me to save credentials.
- You should see the display of the remote computer.
If you can't connect, it may be likely that the remote computer is not powered on; contact the VCL support person for help.
- Login to the remote computer
Use either the privileged itadmin user and the same password as above, or the unprivileged ituser and that same password.
- Logoff when you are done working.
We may need to power down your remote computer to save resources, but since you can't power on the computer, we advise simply logging off for now in the hopes that it will remain on for the next time you use it. Powering down could be a problem for a server, which is intended to be on all of the time. This is a Phase I temporary method of operation; when Phase II reservations are implemented, your remote computer will be suspended at the end of your reservation to free up resources for other users, and resumed the next time you reserve that computer.
Sending Ctrl-Alt-Del to a Virtual Computer
For Windows operating systems, Ctrl-Alt-Del is called the secure attention sequence, which means that Windows will capture that sequence and not allow any application program running in Windows to use that. Consequently, when you press this sequence from Windows to interact with a remote computer running Windows, your local Windows will present you with a window to control the logoff, shutdown/restart, etc. of the local windows, not the remote computer. You can send Ctrl-Alt-End instead to the remote computer's Windows to simulate Ctrl-Alt-Del.
Using manage_vc, you can click on the C-A-End button to send Ctrl-Alt-Del to the VC. Using an ssh command (e.g., to host 128.208.244.63, VM name wxp):
ssh srondeau@128.208.244.63 send_cad wxp
and enter srondeau's host password (hispassword using the example above). Alternatively:
ssh srondeau@128.208.244.63 sendkeys wxp ctrl-alt-del
with the right password will do the same thing.
Other Keyboard Shortcuts for Virtual Computer
For Windows operating systems:
| Desired Key Combination | Remote Desktop Key Combination | Description |
|---|---|---|
| Ctrl-Alt-Delete | Ctrl-Alt-End | Insert secure key sequence |
| Alt-Esc | Alt-Insert | Switch to another open app |
| Print Scrn | Ctrl-Alt-numpad_minus | Take window screen shot |
| Alt-Print Scrn | Ctrl-Alt-numpad_plus | Take desktop screen shot |
| Ctrl-Esc | Alt-Home | Open Start Menu (Windows 7 and below) |
| Windows Key | Alt-Home | Open Start Menu (Windows 8 and later) |
| Alt-spacebar | Alt-Delete | Open active window system menu |
| (none) | Ctrl-Alt-Pause | Toggle between full screen and window |
| others | Google on "Keyboard Shortcuts" "Remote Desktop" |
Useful keyboard shortcuts web pages are cross-platform keyboard shortcuts, Windows keyboard shortcuts or GNOME keyboard shortcuts.
Using CD/DVD Images
While some remote desktop software allows you to attach a CD/DVD from your local computer as if it was attached to the remote computer, we discourage that use because the data transfer rate across the network is slow and prevents others from using their virtual computer. An alternative is to use pre-loaded copies of a CD or DVD, usually called "ISO images", which are just large files located somewhere that the remote computer can access.
Modern Windows versions can mount .iso files natively.
To use an ISO image:
- Gain access to the ISO images
The ISO images are located on a network share called
\\vboxsvr\iso
In a command shell, map a network drive to that share; for example:
net use i: \\vboxsvr\iso
Note that the software contained on these images is licensed only to the university for academic purposes. Any licenses used during the installation are for lab use only, not for office or home use by anyone — faculty, staff or student.
- Mount the ISO image as a virtual CD/DVD drive
Change Log
| 5 Aug 2020 | Major revision to accomodate .vcl file changes and other updates. |
| 14 Sep 2016 | Changed references to INSTTECH password to MyUW password |
| 2 Apr 2014 | Added other Windows keyboard shortcuts |
| 24 Jan 2013 | Added CoRD as possibility for Mac OS X users |
| 20 Dec 2011 | Clarified which version of PuTTY to use |
| 15 Jan 2011 | Added explanation of sending Ctrl-Alt-Del to remote compupter |
| 19 Nov 2010 | Added link to Quickstart page. |
| 18 Nov 2010 | Revised "Connecting to Remote Computer" section to provide managed and manual ways of connecting. |
| 15 Apr 2010 | Made subsections of "Finding Information..." and clarified how to specify port numbers |
| 6 Apr 2010 | Added section on "Using Various Credentials" |
| 5 Apr 2010 | Revised and expanded section on "Finding Information About Your Remote Computer" |
| 30 Mar 2010 | Added more explicit instructions on finding and running mstsc.exe |
| 29 Mar 2010 | Added info about Remote Desktop connection error |
| 26 Mar 2010 | Original document |
Hours | Support Information | News |
Policies | Emergencies