

Last updated: 26 Jan 2023
Connecting to a SET Virtual Computer
- Windows Clients
- Mac OS Clients
- Linux Clients
- Troubleshooting (not specific to client OS)
- Methods to Display and Interact with VM
- Alternative Ways to Connect to and Use Virtual Computers
- Opting Out of Freeing a VM's Host Resources
On a Windows Computer:
- Prepare pre-requisites:
Pre-requisites Item Description Know your MyUW password Your MyUW password will be required to retrieve information about your virtual computer. Download and run UW Husky OnNet VPN. Some VMs are hosted on computers that can only be accessed from on campus. The UW Husky OnNet VPN allows off-campus computers to access resources such as host computers that are on-campus. Examples of subnets that are accessible only via the VPN are: 172.22.0.0/16, 172.28.0.0/16, and 10.0.0.0/8. If you see a host IP address or a VM's IP address in any of those subnets, you connect to the VPN to access it.
Download and install the appropriate package for your computer -- it may prompt you for your computer's login account password. Then run the BIG-IP Edge application -- you will be prompted for your UW Net ID and MyUW/Canvas password. Connect to "UW Campus Network Traffic Only", and then you can use other programs to access campus computers (as documented below).
- Download the GUI manager for Windows(manage_vc) and unzip it.
- Optionally install .NET Framework 3.5
When you run manage_vc, you may need to install .NET Framework 3.5, which can be installed when Windows prompts you, or use the link above.
- Avoid problems with first-time use of cssgate
Students who have never logged into cssgate should do so prior to running manage_vc:
- Open a command prompt window (Start Menu/Run, then enter cmd)
- In the command prompt, try this command (substitute your UW Net ID for uwnetid):
ssh uwnetid@cssgate.insttech.washington.edu echo logged on/offanswer "yes" to any questions, and enter your MyUW password. If Windows finds the ssh command (in versions of Windows 10 only after the "Fall Creator's Update"), you should see:
logged on/off
- If the ssh command above cannot be found:
Use the plink command found in the folder you unzipped manage_vc_win.zip. Let's say that folder is C:\Users\username\Downloads\manage_vc, where "username" is the user name you login as for your computer (e.g., "stephen"). In the command prompt (substitute your UW Net ID for uwnetid -- for me, it's "srondeau"):
     cd /d C:\Users\stephen\Downloads\manage_vc
     .\plink srondeau@cssgate.insttech.washington.edu echo logged on/off
answer "yes" to any questions, and enter your MyUW password. You should see:
logged on/off
- Retrieve your virtual computer's information:
- Start manage_vc
- When you are prompted:
Please accept or change the user name:
- If managing VMs belonging to your account, make sure the user name is your UW Net Id. Provide your MyUW password when prompted for it later.
- If managing VMs belonging to a team account, enter your UW Net Id followed by a space and then the team account name.
Provide your account's MyUW password when prompted for it later.
For example:
srondeau _431cst1This example would use the account associated with UW Net Id "srondeau" to access the team account "_431cst1". Later, srondeau's MyUW password would be entered to get the virtual computer information associated with the team account.
- After retrieving virtual computer information:
- To connect to the remote desktop/console for a virtual computer:
Click on the Connect button.
If the machine is not started or "running" (check via the Show State button), you have to first click on the Start button and then, a minute or more later, the Connect button to connect to the virtual computer's display.
You should be aware of Methods to Display and Interact with VM.
- For easy login to the virtual computer's guest operating system:
If the operating system is Windows, often a Ctrl-Alt-Del is needed to get to a login window. That is not possible from the computer running manage_vc, because Windows installed on that computer will intercept Ctrl-Alt-Del and use it locally. To send Ctrl-Alt-Del to the remote virtual computer, use Ctrl-Alt-End. See Other Keyboard Shortcuts for more shortcuts.
Enter or choose the login name, and when the cursor is in the password text box, click on manage_vc's Paste password button if the name on the button matches the login name.
- Tabs at the top of the window allow you to access
different virtual computers.
The name on each tab is the name of a virtual computer.
- Pasting arbitrary text to desktop (console or window) is possible.
Bi-directional copy and pasting is usually enabled on all VMs. However, it requires the VM to be running a GUI because GUIs generally support copy and paste operations. The "paste" command provided by manage_vc basically sends raw keystrokes directly to the desktop, so it can be used for virtual desktops (e.g., gnome, KDE, Cinnamon, Windows, etc.) as well as command-line console windows.
In the dropdown box to the right of the Do cmd: button, enter:
paste Here is a sentence to paste!
and click on the Do cmd: button -- the text
Here is a sentence to paste!
will be pasted to the virtual desktop of the current VM.
The best pasting destination is probably an active terminal window, command shell, or console window, but it may work in GUIs as long as the text cursor is pre-positioned in the desired GUI control field, such as a text box or combo box.
Of course, you probably want to paste a line of text after the "paste" command from text you copied/put on the clipboard on your computer, perhaps from a web page. Multiple lines would have to be pasted one line at time.
- To connect to the remote desktop/console for a virtual computer:
- When done working with the VM for the day
Logging out of the guest OS login session can be useful. In addition, you may want to gracefully (i.e., through the use of OS commands or features) shutdown the operating system and hence the VM. This helps to conserve resources on the host where the VM resides, and makes everyone's experience on that host better (multiple VMs are often running on the same host).
SET Lab Staff may also decide to set up the VMs such that input activity can be detected, to conserve valuable host resources. An automated process can take action if there is no detected input activity for a period of time. Such action could be gracefully shutting down the guest OS or powering off the VM.
You will only want to use the Power Off ... button if you have no other recourse and want to force the VM off. This is like pulling the plug on a real computer, and can have similar consequences, like loss of data or data corruption because the guest OS did not have a chance to write its buffers correctly to disk.
On a Mac OS Computer:
- Prepare pre-requisites:
Pre-requisites Item Description Download the GUI manager for MacOS(manage_vc) and unzip it. Know your MyUW password Your MyUW password will be required to retrieve information about your virtual computer(s). Download and run UW Husky OnNet VPN. Some VMs are hosted on computers that can only be accessed from on campus. The UW Husky OnNet VPN allows off-campus computers to access resources such as host computers that are on-campus. Examples of subnets that are accessible only via the VPN are: 172.22.0.0/16, 172.28.0.0/16, and 10.0.0.0/8. If you see a host IP address or a VM's IP address in any of those subnets, you connect to the VPN to access it.
Download and install the appropriate package for your computer -- it may prompt you for your computer's login account password. Then run the BIG-IP Edge application -- you will be prompted for your UW Net ID and MyUW/Canvas password. Connect to "UW Campus Network Traffic Only", and then you can use other programs to access campus computers (as documented below).
- After unzipping the manage_vc_mac.zip file in a Terminal
window, you should have a manage_vc directory.
- Change your working directory to that one:
cd manage_vc
- Inside that directory are all of the required files. Please read the
readme_install file for the latest information on how to install:
cat readme_install
- The standard way to install is:
perl mvc_install
and follow the instructions provided.
- Now that you have installed everything, you should be able to use manage_vc.
- Change your working directory to that one:
- Using manage_vc
- Start manage_vc from any Terminal prompt:
manage_vc
- Retrieve the information for the virtual machines (VM) or virtual computers (VC) you have access to.
Each user or team is assigned a one or more VMs to use. The VM information is stored on cssgate.insttech.washington.edu, and is accessible by providing your login credentials (UW Net Id and MyUW/Canvas password). manage_vc will prompt you for a user name, which for non-team accounts should simply be your UW Net Id; for team accounts, it is your UW Net Id followed by a blank and then your team account name. In either case, you will be prompted for your MyUW/Canvas password.
Entering the correct UW Net Id, optional team account, and password should pull the VM information from cssgate and store it locally, so that you can reuse that stored info again without having to enter your credentials each time you start manage_vc.
- You should then see one or more tab names near the top
of the window.
These tab names are the names of your VMs, one tab per VM. The information for the first VM is shown and you can manage that VM immediately. Using any other VM requires you to click on the tab name for that VM.
Except for VM-specific information, the user interface (buttons, drop-down boxes, dialog boxes, etc.) for each VM is laid out and presented the same way.
- Get familiar with managing your VM(s)
While you can manage most aspects of each VM yourself, they have been set up for your course or research needs. Normally you don't change much about them unless instructed to do so. Consequently, while the interface may seem daunting, there are only a few common tasks to do, which are explained below.
- Determine the state of your VM
A virtual machine can be in different states, but the two most important are "powered off" and "running", which are very similar to a real computer.
You can see the state of a VM by clicking on its Show State button.
Initially, VMs are often in the "powered off" state, which means you could modify the VM if need be, but most of time it means you need to effectively turn it on by "starting" it.
- Start a VM
A VM's state changes from "powered off" (or "saved" or "aborted") to "running" when you click on the Start ... button. The button name contains the name of the VM, or the first six characters of it if the VM name is longer than six characters. To see the full VM name, hover the mouse over the Start button.
- Connect to a VM's display
This is the critical step in interacting with the VM. To do so effectively, you must be able to see the virtual display attached to the VM, and interact with it via keyboard and mouse activity. Clicking on the Connect ... button will re-write a key remote desktop protocol (RDP) file (file type .rdp) with nearly all of the pertinent information in it for you to connect, and provide instructions in a message box on how to complete the process of connecting to the display.
Essentially, you need to start the Microsoft Remote Desktop application and import the .rdp file mentioned in the message box. Note that the files may be ordered alphabetically, so make sure you look through the entire file listing.
Once that is done, you should edit the PC created by Microsoft Remote Desktop in order to set and save your credentials. Those credentials are not the same as the cssgate ones you used, but are specific for the set of VMs to which you have access — the message box will tell you which user account to use, and you will need to supply the password on the clipboard when setting them up.
The credentials for this set of VMs need only be entered correctly once. After that, you simply reuse them.
To connect to a VM, in Microsoft Remote Desktop, you simply double-click on the PC name icon — that name includes the name of the VM you desire. You should then see its display (as long as the VM is started and still "running").
Troubleshoot Microsoft Remote Desktop returning error 0x4 or 0x204 after you click "Connect".
-
You should be aware of Methods to Display and Interact with VM.
- Interact with the guest operating system (OS) running on the VM
Most of the time, a guest OS has been pre-installed on your VM's virtual disk drive by SET Lab Staff. Therefore, when you start your VM, it starts the guest OS. Most modern OSes require you to login to them, and so there is an additional authentication step needed, using a login account that only the guest OS knows and is provided to you in the manage_vc interface.
You may need to cause the guest OS to ask for a login or user name. For a Windows VM, one often has to send a "Ctrl-Alt-Del" key sequence to the OS to tell it to show the login prompt. However, on many client OSes (like Windows and Linux) Ctrl-Alt-Del will likely restart your own computer — not the VM. For a Mac, this reaction is less likely. A safe way to send Ctrl-Alt-Del to a VM is to actually send Ctrl-Alt-End, which is the purpose of the C-A-E button.
How do you determine what guest OS login account name works? Look to the right of the Paste button — use that name as the login account name. Often, it is "root", "itadmin", or "administrator". When you see the OS login prompt for a user name, enter that login account name.
After entering the login account name, the OS will likely prompt for a password. The password can be revealed and copied to the clipboard by clicking on the Reveal button, or it can be pasted into the password field directly by clicking on the Paste button.
- Once logged into the guest OS, you can interact as need be
You interact by entering keystrokes, or possibly moving the mouse and clicking on graphical user interface (GUI) items on the OS desktop with the mouse buttons — all while your mouse remains inside the confines of the VM's display window.
- For easy login to the virtual computer's guest operating system:
If the operating system is Windows, often a Ctrl-Alt-Del is needed to get to a login window. That is not possible from the computer running manage_vc, because Windows installed on that computer will intercept Ctrl-Alt-Del and use it locally. To send Ctrl-Alt-Del to the remote virtual computer, use Ctrl-Alt-End. See Other Keyboard Shortcuts for more shortcuts.
Enter or choose the login name, and when the cursor is in the password text box, click on manage_vc's Paste password button if the name on the button matches the login name.
- Tabs at the top of the window allow you to access
different virtual computers.
The name on each tab is the name of a virtual computer.
- Pasting arbitrary text to desktop (console or window) is possible.
Bi-directional copy and pasting is usually enabled on all VMs. However, it requires the VM to be running a GUI because GUIs generally support copy and paste operations. The "paste" command provided by manage_vc basically sends raw keystrokes directly to the desktop, so it can be used for virtual desktops (e.g., gnome, KDE, Cinnamon, Windows, etc.) as well as command-line console windows.
In the dropdown box to the right of the Do cmd: button, enter:
paste Here is a sentence to paste!and click on the Do cmd: button -- the text
Here is a sentence to paste!will be pasted to the virtual desktop of the current VM.
The best pasting destination is probably an active terminal window, command shell, or console window, but it may work in GUIs as long as the text cursor is pre-positioned in the desired GUI control field, such as a text box or combo box.
Of course, you probably want to paste a line of text after the "paste" command from text you copied/put on the clipboard on your computer, perhaps from a web page. Multiple lines would have to be pasted one line at time.
- For easy login to the virtual computer's guest operating system:
- When done working with the VM for the day
Logging out of the guest OS login session can be useful. In addition, you may want to gracefully (i.e., through the use of OS commands or features) shutdown the operating system and hence the VM. This helps to conserve resources on the host where the VM resides, and makes everyone's experience on that host better (multiple VMs are often running on the same host).
SET Lab Staff may also decide to set up the VMs such that input activity can be detected, to conserve valuable host resources. An automated process can take action if there is no detected input activity for a period of time. Such action could be gracefully shutting down the guest OS or powering off the VM.
You will only want to use the Power Off ... button if you have no other recourse and want to force the VM off. This is like pulling the plug on a real computer, and can have similar consequences, like loss of data or data corruption because the guest OS did not have a chance to write its buffers correctly to disk.
- Start manage_vc from any Terminal prompt:
On a Linux Computer:
- Prepare pre-requisites:
Pre-requisites Item Description Download and install a remote desktop package If necessary, download and install freerdp/xfreerdp. As of October 2022, there is no manage_vc for Linux. Know your MyUW password Your MyUW password will be required to retrieve information about your virtual computer(s). Download and run UW Husky OnNet VPN. Some VMs are hosted on computers that can only be accessed from on campus. The UW Husky OnNet VPN allows off-campus computers to access resources such as host computers that are on-campus. Examples of subnets that are accessible only via the VPN are: 172.22.0.0/16, 172.28.0.0/16, and 10.0.0.0/8. If you see a host IP address or a VM's IP address in any of those subnets, you connect to the VPN to access it.
Download and install the appropriate package for your computer -- it may prompt you for your computer's login account password. Then run the BIG-IP Edge application -- you will be prompted for your UW Net ID and MyUW/Canvas password. Connect to "UW Campus Network Traffic Only", and then you can use other programs to access campus computers (as documented below).
- Retrieve the .vcl file from cssgate using the terminal application.
You must know your MyUW password to copy files using scp.
- If you are not using a team account:
scp uwnetid@cssgate.insttech.washington.edu:.vcl .The trailing period '.' is required — and it is preceded by a space. The command will put the .vcl file in the current directory.
For example, for the UW Net ID srondeau:scp srondeau@cssgate.insttech.washington.edu:.vcl .Look at the file using cat; e.g.:
cat .vcl - If you are using a team account:
scp uwnetid@cssgate.insttech.washington.edu:/home/INSTTECH/teamacct/.vcl .Substitute your team account name for "teamacct". The trailing period '.' is required — and it is preceded by a space. The command will put the .vcl file in the current directory.
For example, if my UW Net ID is srondeau, and my team account is _452e1:scp srondeau@cssgate.insttech.washington.edu:/home/INSTTECH/_452e1/.vcl .That command will put the team's .vcl file in the current directory. Look at the file using cat; e.g.:
cat .vcl
- If you are not using a team account:
- Manage the VM by Issuing Commands
The VM can be managed via ssh by sending restricted commands from the client computer to the host (the computer hosting the VM).
For example, to show what commands are possible, use the help command — given the information in the .vcl file, this is the generic form of the command:
ssh uwnetid@ipaddr help
"uwnetid" is normally your UW Net Id, but for team accounts, use your team account name instead of "uwnetid". For "ipaddr", use the IP address found in the .vcl file's line that contains (host IP) in the "Host and Guest Login Information" section. Also use the password mentioned immediately above that section (normally, the first line, but not always) when prompted for a password.
You can enter any command listed in the help list, including commands you may have received from your instructor or SET Lab staff about entering in manage_vc's Do cmd: dropdown or text box, even though you are not running manage_vc. Note that manage_vc's Do cmd: processing hides the details of sending the command via ssh.
- Start the VM
The VM can be started via ssh. All of the VM/VCL names are in the .vcl file; see the lines below. The second line contains the VM or VCL name (which is w2016a):
20200323 09:52:15 vcl user srondeau password 'xxxxyyyyzzzz'
20200323 09:52:15 -------- Host and Guest Login Information ----------
20200323 09:52:15 vcl host cn3-vcl4 '140.142.71.14' (host IP)
20200323 09:52:15 --------- Information for w2016a ----------
20200323 09:52:15 | vcl vm w2016a (vrdp) '140.142.71.14:53765' — use srondeau password above
20200323 09:52:15 | vcl vm w2016a (login) Administrator password 'pw2020'
For "ipaddr", use the IP address (within the single quotes) found in the .vcl file's "Host and Guest Login Information" section, before (host IP).
Note that there may be more than one line for "vcl user" and "Host and Guest Login" information. This happens when you are enrolled in more than one course that uses the VCL. You must always use the information in the lines immediately preceding the "Information for" line of the VM you are interested in working with.
In the example .vcl file excerpt above, the IP address of the host is 140.142.71.14.
The generic command to start a VM looks like this:
ssh uwnetid@ipaddr start vmname
From the example, the UW Net ID is srondeau, the host IP address is 140.142.71.14, and the VM name is w2016a, resulting in this command to start the VM:
ssh srondeau@140.142.71.14 start w2016a
For team accounts, use the team account name found in the first line of the .vcl file, substituting it for "uwnetid".
When ssh prompts for a password, use the password mentioned in that first line (in this case, it is xxxxyyyyzzzz). Copy and paste works well with complex passwords — select everything between the single quotes in the first line, and copy that string, pasting it at the password prompt. - Connect to VM's display
- Make sure the VM is started (see above).
To show the state of the VM, the generic command is:
ssh uwnetid@ipaddr vcl_status vmname
For example (see above for specifics):
ssh srondeau@140.142.71.14 vcl_status w2016a
It must be running. If not, start it.
- Connect to the display by
running the remote desktop command with the correct information.
Configure the remote desktop app, or provide the information on the remote desktop command line (see this prerequisite).
You must provide your remote desktop app or command with the IP address, port number, user name and password.
Using the sample VCL information above, e.g., run the xfreerdp command from a desktop terminal window, requesting a 1280x1024 window, and the ability to use the clipboard between client computer and the VM's guest OS:
xfreerdp /v:140.142.71.14:53765 /u:srondeau /p:'xxxxyyyyzzzz' /w:1280 /h:1024 /clipboard
- You should be aware of other Methods to Display and Interact with VM.
- Make sure the VM is started (see above).
- Interact with the guest operating system (OS) running on the VM
Most of the time, a guest OS has been pre-installed on your VM's virtual disk drive by SET Lab Staff. Therefore, when you start your VM, it starts the guest OS. Most modern OSes require you to login to them, and so there is an additional authentication step needed, using a login account that only the guest OS knows and is provided to you in the .vcl file.
You may need to cause the guest OS to ask for a login or user name. For a Windows VM, one often has to send a "Ctrl-Alt-Del" key sequence to the OS to tell it to show the login prompt. To do so (see Issue Commands to the VM for details)
ssh uwnetid@ipaddr send_cad vmname
For example (see above for specifics):
ssh srondeau@140.142.71.14 send_cad w2016a
How do you determine what guest OS login account name works? Look in the .vcl file for the line containing (login) for your VM name. In the example above, the login name is Administrator and the password is pw2020 — use that name as the login account name, remembering that Linux guest OSes use case-sensitive login names; respect the case provided. Often, a login name is "root", "itadmin", or "administrator" (for Windows, the case of the login name is not respected). When you see the OS login prompt for a user name, enter that login account name.
After entering the login account name, the OS will likely prompt for a password. We strongly advise copying the password to the clipboard so that it can be pasted into the password field directly.
- Once logged into the guest OS, you can interact as need be
You interact by entering keystrokes, or possibly moving the mouse and clicking on graphical user interface (GUI) items on the OS desktop with the mouse buttons — all while your mouse remains inside the confines of the VM's display window.
- When done working with the VM for the day
Logging out of the guest OS login session can be useful. In addition, you may want to gracefully (i.e., through the use of OS commands or features) shutdown the operating system and hence the VM. This helps to conserve resources on the host where the VM resides, and makes everyone's experience on that host better (multiple VMs are often running on the same host). Gracefully shutting down the OS is best done from within the interactive login session of the guest OS -- the shutdown command does not always cause the guest OS to shut down (especially, in the case of Windows).
SET Lab Staff may also decide to set up the VMs such that input activity can be detected, to conserve valuable host resources. An automated process can take action if there is no detected input activity for a period of time. Such action could be gracefully shutting down the guest OS or powering off the VM.
You will only want to use the poweroff command if you have no other recourse and want to force the VM off. This is like pulling the plug on a real computer, and can have similar consequences, such as loss of data or data corruption because the guest OS did not have a chance to write its buffers correctly to disk.
Methods to Display and Interact with VM
One of three methods will be used to display the screen and interact with the VM remotely:
- a graphical remote desktop,
- a command-line oriented SSH session provided by the guest OS, or
- a manual means of looking at screenshots of the VM's display and sending keys to the VM
What follows are some specifics about how to interact using the methods above.
- Remote Desktop Interaction Method
The "remote desktop" method is by far the easiest and likely the most familiar to use. However, it requires either:
- VirtualBox on the host runs a virtual RDP ("VRDP") service for each VM
This is a much more reliable way of viewing the desktop or console of the virtual machine. It does not depend on the VM's network or NICs to be set up correctly. Consequently, you can configure your virtual network inside the guest operating system.
The information needed to use VRDP is present in two lines. Each VM after the Autumn 2020 quarter should have a line containing (vrdp), immediately followed by the connection information needed by your RDP client — the IP address of the host followed by a colon, then the port on the host to use:
20200323 09:52:15 --------- Information for w2016a ----------
20200323 09:52:15 | vcl vm w2016a (vrdp) '140.142.71.14:53765' — use srondeau password above
20200323 09:52:15 | vcl vm w2016a (login) Administrator password 'pw2020'
In this example, the host and port information is 140.142.71.14:53765. Sometimes the port (e.g., 53765 is a separate argument from the host IP address (e.g., 140.142.71.14). The user name and password to use is found on the first line:
20200323 09:52:15 vcl user srondeau password 'xxxxyyyyzzzz'In this example, the user is srondeau and the password is xxxxyyyyzzzz
- the guest operating system runs a service that provides
the remote desktop protocol ("guest RDP")
That service must be installed and configured correctly, as well as started. The guest's network must be functioning correctly. For Windows and Linux guest operating systems, the guest RDP service may have been set up for you by SET lab staff. Note that Windows RDP services work well, but Linux RDP services don't always work (although SET Labs staff have had success with xrdp).
The issue then is how to use remote desktop, and that depends on the network methods your virtual network interface cards, or NICs, use. Only the Network Address Translation (NAT) and "bridged" methods allow remote access from any computer to your guest OS. In either case, the VM's guest OS must be fully up and running (i.e., the VM must be started), and the desired NIC must be connected to the network and functioning (i.e., not disabled).
You should also know the configuration of the NICs defined for your VM. Not all of that information is in the .vcl file. The NIC information can be displayed by using the show_nic command; e.g.:
ssh srondeau@140.142.71.14 show_nic w2016aYou may see either "NAT" or "bridged" in one or more of the displayed NIC information. For "bridged", note the NIC's number for the show_vm_ip command below. Also, note the cable connected status, which indicates whether the NIC is connected to a network; it usually is connected, but could help during troubleshooting a problem.
- Using the NAT networking method
Continuing with the example above, consider these lines excerpted from a .vcl file:
20200323 09:52:15 | vcl vm w2016a (guest login) Administrator password 'pw2020'
20200323 09:52:15 +-------- PORT Information ----------
20200323 09:52:15 | vcl w2016a cn8-vcl12 host port '140.142.71.14:50011' (ms-wbt-server) for guest NIC 2 port 3389/TCP
20200323 09:52:15 +------- End of PORT Information ----------
A NAT device can allow external access from the host to the VM's guest operating system by mapping a host port to a guest port. This is normally set up for you by SET Lab staff. For your RDP client program, you will need the host IP address and the host port.
The .vcl file's "PORT Information" section has information about the port mappings. You are looking for a service name of "ms-wbt-server" to get the right mapping information. Once you find that line, supply the 'IP address:port' string to your RDP client. The user name will be the account name for the guest operating system, which is often "administrator" or "itadmin" for Windows, and "root" or "itadmin" for Linux. The password is usually listed in the .vcl file "login" line in the "Host and Guest Login Information" section.
However, you may change the user name or password within your guest operating system, or perhaps you may even have a domain name if you created your own Windows domain. For Windows, you would need to make sure that user is in the Administrators group or is explicitly allowed to connect remotely. In those cases, you would supply whatever the current account names, passwords and domain names you know; there is no way for the .vcl file to be able to contain that information.
- Using the Bridged networking method
The bridged networking method is trickier, because we may not know the IP address, and it is critical for connecting to the guest OS. You can determine the IP address of the guest by entering (e.g.):
ssh srondeau@140.142.71.14 show_vm_ip win10 2The NIC number "2" means use the second NIC to look for the win10 VM's IP address.
While we can often presume the port is the default 3389, it may be changed to a different port to make it harder for hackers to find the RDP port. If the VM was configured by SET lab staff, they should tell you of any non-default RDP port that they used — it won't be in the .vcl file. You would need to provide the returned guest/VM IP address and the RDP port used to your RDP client, together with the guest user name and password.
The user name will be the account name for the guest operating system, which is often "administrator" or "itadmin" for Windows, and "root" or "itadmin" for Linux. The password is usually listed in the .vcl file "login" line in the "Host and Guest Login Information" section. However, if you add or change users and/or their passwords, and they are allowed to access the guest operating system remotely, you must supply those user account names and passwords instead of information from the .vcl file.
- Using the NAT networking method
Copying and pasting the .vcl file password (which is between the quotes) is probably your best choice, as the password can be cryptic.
If using a command, you might find that command in your history when you want to connect again.
- VirtualBox on the host runs a virtual RDP ("VRDP") service for each VM
- SSH Remote Interaction Method
The "SSH" remote interaction method is the next easiest to use, but requires familiarity with commands. However, it requires an SSH service to be installed, configured correctly, and running. Most of the time, for most Linux guest operating systems, the SSH service has been set up for you.
The way to use the NICs is very similar to the RDP NAT or Bridged information is documented, substituting "ssh" for "rdp". The default ssh port is 22.
- Remote Manual Interaction Method
This interaction method does not require something pre-installed on the VM, but it is much harder to work with, and, as such, should be considered a last resort or your only choice if you install the guest operating system yourself.
Alternative Ways to Connect to and Use Virtual Computers
Click here for details on alternative ways to connect to and use virtual computers.
Opting Out of Freeing a VM's Host Resources
As of January 2021 and thereafter, VMs that haven't had any input activity for more than 30 minutes (or other amount of time chosen by the instructor) will either be gracefully shutdown (if possible) or have their state saved.
As of December 2020, Windows VMs will be gracefully shutdown by default so that they can accurately detect input activity. Linux VMs can do that after resuming from saving their state, so saving state is their default.
"Saving the state" is essentially the same as hibernating a laptop or desktop computer. When a computer is hibernated, the contents of the RAM and the state of the CPU (registers, instruction pointer, etc.) are saved to secondary storage, to be restored at a later point in time, when the computer is started. Hibernation is often done to conserve battery or wall power, because after the hibernation is complete, the the display is turned off and the computer is powered down.
Saving the VM's state means that the host resources (CPU cores and RAM) dedicated for that VM's use can be freed and made available to others on the same host. This allows the host, often a powerful and expensive server, to be used by more VMs. Increasing the utilization of a server helps to justify the cost of the server. That is, if the server has a lot of VMs running that are doing essentially nothing, with no user interacting with them, then those dedicated server resources can't be used by other VMs to do something useful.
In an academic environment, the VMs that students are assigned are often used sporadically, and yet the students don't shut down the VMs after they are finished using them (to start them up later when they need them again). Consequently, a lot of host resources are wasted.
However, interacting with the console, terminal session or desktop of a guest operating system (OS) isn't the only academic use for VMs. Other uses include doing intensive computations or input/output, providing a service to another VM or real computer, or acting as the target of a penetration test. In those cases, user interaction with the VM via keyboard or mouse (or "input") activity may be minimal, and freeing up the VM's host resources based solely on a lack of input activity could be counter-productive — the VM is no longer running.
Types of Opt-out Defaults
There are several types of opt-out defaults; some are overrideable by users, while others are not:
- no explicitly-set default for course or user: overrideable
- instructor or SET lab staff, explicitly set course-wide opt-out defaults: NOT overrideable
- SET lab staff explicitly set per-user opt-out defaults: NOT overrideable
- user explicitly set opt-out default: overrideable
The following documentation pertains to when there is an opt-out default that a user can override.
We provide a means to "opt out" of the default condition of more than 30 minutes of idle time (i.e., lack of input activity) causing the shutdown or saving of the state of a VM, and thus the freeing of that VM's host resources. This opting out is intended to indicate that the VM's host resources should not be freed up. Note that SET Lab staff can override any user VM opt-out setting, if need be or if the course instructor requests it.
The opt_out command is what is used:
- For manage_vc, the command and its arguments are typed in the drop-down box to the right of the Do cmd: button, and the Do cmd: button and subsequent OK buttons are clicked.
- For Mac/Linux users, the command follows the ssh command that is normally used to manage the VM (see below for an example).
The general form of command is:
opt_out vm_name condition then action
where:
- vm_name
- the name of the VM
- condition
-
either a
- single word
- see below
- condition
- see below
savestate ignore default shutdown poweroff
"savestate" saves the state of the VM, and is the same as "default". Saving the state takes a significant amount of time (depending on the amount of virtual RAM), and restoring it later when the VM is started also takes significant time.
"shutdown" indicates that the VM should be gracefully shut down, which provides the guest OS the opportunity to flush caches to disk and do other clean up work prior to powering off. This takes much less disk space because the state of RAM does not need to be saved, and less time to start up the VM again later.
"poweroff" is the equivalent to "pulling the plug" on a real computer that does not run on battery power. It can cause file integrity problems but is very fast. In an academic environment, VMs rarely have file integrity problems due to low virtual disk activity.
"ignore" means to allow this VM to continue running, and hence it won't free up any host resources that the VM uses.
A single-word condition is one of these words:
null always true default
"null", "always" and "true" are synonyms, indicating that the action is always done. "default" means to use the default condition, which is:
input_idle gt 30m
"help" is also allowed (no then part needed), and will output help for this command.
A condition is of the form:
term1 op term2
where:
- term1
- Usually, the first term is input_idle, meaning the duration of time that no input activity has been detected In the future, more terms may be defined and implemented.
- op
- either lt for "less than", or gt, for "greater than"
- term2
-
a value to compare with the value of term1, of one of the following forms:
dddm
dddh
where ddd is a positive integer representing the number of minutes (if m follows) or hours (if h follows) to compare with input_idle's value.
Here are some examples, using win10 as the VM name, in two forms: the first is for the manage_vc Do cmd: drop-down box, and the second is the same command using ssh for VM user with UW Net ID srondeau whose VMs are on host 140.142.71.5:
- Condition example:
- manage_vc:
opt_out win10 input_idle gt 45m then shutdown
- ssh:
ssh srondeau@140.142.71.5 opt_out win10 input_idle gt 45m then shutdown
which means that the win10 VM should be gracefully shut down after 45 minutes without any input activity.
- manage_vc:
- Single-word condition example:
- manage_vc:
opt_out win10 true then ignore
- ssh:
ssh srondeau@140.142.71.5 opt_out win10 true then ignore
which means that the win10 VM should never be subject to having its resources freed.
- manage_vc:
Troubleshooting manage_vc on Windows
- Access denied.
It may be possible that something running on your Windows computer, like an anti-virus or cybersecurity tool (e.g., AVG) is blocking access.
Another possibility is that you have a space in your user profile name. To see that name, open a command prompt and enter:
echo %userprofile%
If that is the case, then you may need to download version 4.1.10 or higher of manage_vc for Windows.
- Traceback (most recent call last): File "\\home.tacoma.uw.edu\srondeau$\scripts\python\manage_vc\manage_vc.py", line 3211, in <module>
The line number may vary, depending on the version of manage_vc. Version 4.1.9 or higher (4.1.10+) fixes the problem, which was an unhandled exception that is now handled. Download manage_vc_win.zip for Windows here..
- "Internal error" when connecting to VM's display
This comes from either a misconfiguration in the settings for the Microsoft remote desktop client you are using, or from some other error in that client. Try downloading and unzipping manage_vc_win.zip to get the latest version, and use that one to connect.
- manage_vc.exe has a virus or is quarantined
This is likely a false positive from your anti-virus tool (often, Microsoft's Windows Defender). manage_vc was deemed to be free from viruses, according to Sophos, the UW's choice for antivirus software.
manage_vc is written in Python and compiled into an executable file. Antivirus software generally use signatures to detect malware. Since AutoIT Script is a general-purpose language with the ability to change the Windows environment, it is used by some malware authors. Another malware-detection technique is to use heuristics to detect behavior that might indicate the presence of malware. Either a signature incorrectly identified manage_vc.exe to be malware, or some heuristic determined that it was suspect.
The default behavior of antivirus software is usually to "quarantine" the file, which makes it not-executable and may even move it to a different location. Since false positives are fairly common, antivirus software often give you the ability to allow a file deemed as malware to be an exception — to "whitelist" the file.
To whitelist manage_vc.exe in Windows Defender:
- Go to Settings/Windows Defender/Virus & Threat Protection/Threat History.
- Click on the Allowed Threats/See full history link.
- Click on the dropdown box for the threat listed (use See details to verify it is manage_vc.exe that is considered the threat).
- Choose to Allow the threat.
Alternatively, you could install Sophos. Windows Defender automatically disables itself if another antivirus tool is installed and active, so Sophos would override any malware detection Windows Defender uses. Since Sophos doesn't consider manage_vc.exe to be malware, you could simply download and unzip manage_vc_win.zip and be able to use manage_vc.exe.
- Can't ping cssgate.insttech.washington.edu
Even if you can't ping it, execution continues after you click OK, so you may still be able to retrieve the VCL information file.
- You aren't connected to the network.
Double-check your network connections... try manually pinging google.com in a cmd shell:
ping google.comIf that works, ping cssgate:
ping cssgate.insttech.washington.edu - You are using IPv6 instead of IPv4 addresses.
Check by using ipconfig in a cmd shell. Use of IPv6 is untested.
- You have an old version of manage_vc.
Check the version number — it should be later than 4.0. If not, re-download and unzip manage_vc_win.zip.
- You aren't connected to the network.
- Can't find scp program
Change the manage_vc.ini file to provide the correct path to the scp program. Putty uses "pscp.exe" for the scp program name.
- Can't find ssh program
Change the manage_vc.ini file to provide the correct path to the ssh program. Putty uses "plink.exe" for the ssh program name.
- VM's desktop size is too small
Change the manage_vc.ini file to provide the desired desktop width and height. Either add to an older (pre-3.16 manage_vc) file or change the values. For example, to change from default 1024x768 desktop to 1280x1024, this .ini section information should be present:
[desktop]
width = 1280
height = 1024
You will need to exit manage_vc, then start it again for the .ini file change to take effect when you click on the Connect button.
- VM's desktop is not full-screen
Change the manage_vc.ini file to provide the desired desktop "screen mode id". For fullscreen, this .ini section information must be present:
[desktop]
mode = 2
You may also want to change the width and height values, as changing to full screen does not scale anything or change the resolution.
You will need to exit manage_vc, then start it again for the .ini file change to take effect when you click on the Connect button.
- Can't find ... (file name with .vcl in it)
You may not have successfully contacted cssgate to download the VCL information file. It could be that your IP address is blocked; contact SET lab staff" for help.
- Access is not allowed for ... (file name with .vcl in it)
You do not have write access to that file location.
- Unable to open file ... (file name with .vcl in it)
There was some error with opening that file.
- The list of VMs is different from what was expected.
You may be referencing an old set of VMs from a previous class. In some cases, if you should be using a team account, you may have omitted the team account name after your UW Net Id when prompted for a user name.
- Connection refused: FATAL NETWORK ERROR
There could be a variety of problems causing this, but the two most common ones are the host computer (where the VM is running) is blocking your IP address (contact Support with your IP address), or you may have changed your PuTTY configuration's default settings to use a protocol other than SSH. In one case, a student set the default to Serial and didn't realize this was a universal setting -- all PuTTY commands, such as plink and pscp, would respect that setting and attempt to connect via the serial port.
- plink: unknown option "-no-antispoof"
The version of plink that manage_vc found to use is out of date. Download and unzip the latest version of manage_vc and this will be resolved by default, ignoring any "ssh" and "scp" commands that defaulted or you specified manage_vc.ini file, and using just the ones in the manage_vc directory.
- The server's host key is not cached in the registry. [...]
Connection abandoned.
The version of manage_vc should be at 3.05 or higher to avoid this problem. Download and unzip the latest version of manage_vc and this will be resolved by default, ignoring any "ssh" and "scp" commands that defaulted or you specified manage_vc.ini file, and using just the ones in the manage_vc directory.
- Store key in cache? (y/n)
You normally answer:
y
to this prompt.
- ssh_init: Network error: Cannot assign requested address
This is normally due to a port not being specified (or specified as 0) for the pscp tool used by manage_vc. This happened in versions prior to 3.05. Download and unzip the latest version of manage_vc to fix this.
Troubleshooting manage_vc on MacOS
- "Alert" message when trying to get VCL information
An information box that only says "Alert" may appear after you enter your cssgate password. That likely means that the host key for cssgate is not present on your computer, and the scp command is asking for it but its error messages were not something that manage_vc could recognize. There are three resolutions to this problem:
- Re-download and install manage_vc (4.1.6 or higher)
This problem has been fixed in manage_vc 4.1.6 and above.
The easiest thing to do is to delete the manage_vc directory. Often, this is in your home directory's "Downloads" folder.
rm -rf ~/Downloads/manage_vc
Be very careful there are no typos, as this is a powerful command that can delete more files than you think if a mistake is made. Then download manage_vc_mac.zip and install manage_vc again (pressing enter and minimizing windows when asked to install python and Microsoft Remote Desktop):
cd ~/Downloads
perl mvc_install
Start manage_vc after that and use as normal.
- Login to cssgate once
Login to see the prompt and answer the question ("yes") about adding the host key ("exit") simply closes the ssh session immediately:
ssh uwnetid@cssgate.insttech.washington.edu exitThen close manage_vc, and start it again. It should allow the transfer of the VM information (in the .vcl file) this second time, now that the host key has been accepted.
- Re-download and install manage_vc, and use cpvcl script
The current (10 Oct 2022) and future manage_vc_mac.zip file contains a script called cpvcl, which will copy the VM information file (.vcl) and rename it to the proper name for manage_vc to recognize it as already present. You would also see any prompts for the host key that may be preventing manage_vc from doing this under the covers.
The easiest thing to do is to delete the manage_vc directory. Often, this is in your home directory's "Downloads" folder.
rm -rf ~/Downloads/manage_vc
Be very careful there are no typos, as this is a powerful command that can delete more files than you think if a mistake is made. Then download manage_vc_mac.zip and install manage_vc again (pressing enter and minimizing windows when asked to install python and Microsoft Remote Desktop):
cd ~/Downloads
perl mvc_install
After that is done, you can use cpvcl. For example, if the UW Net Id srondeau wanted to access team _555team4's VM information (and was allowed to):
cpvcl srondeau _555team4
and answering the prompts should do it. Start manage_vc after that (with your specific UW Net Id, optional team account, and password) and you should be prompted to "Reuse..." the existing VM information, and you should click on "Yes", since it was just copied to your home directory.
- Re-download and install manage_vc (4.1.6 or higher)
- "Internal error" when connecting to VM's display
This comes from either a misconfiguration in the settings for the Microsoft remote desktop client you are using, or from some other error in that client. Try downloading and unzipping manage_vc_mac.zip to get the latest version, and use that one to connect.
- Error 0x4 (or 0x204) when connecting to VM's display
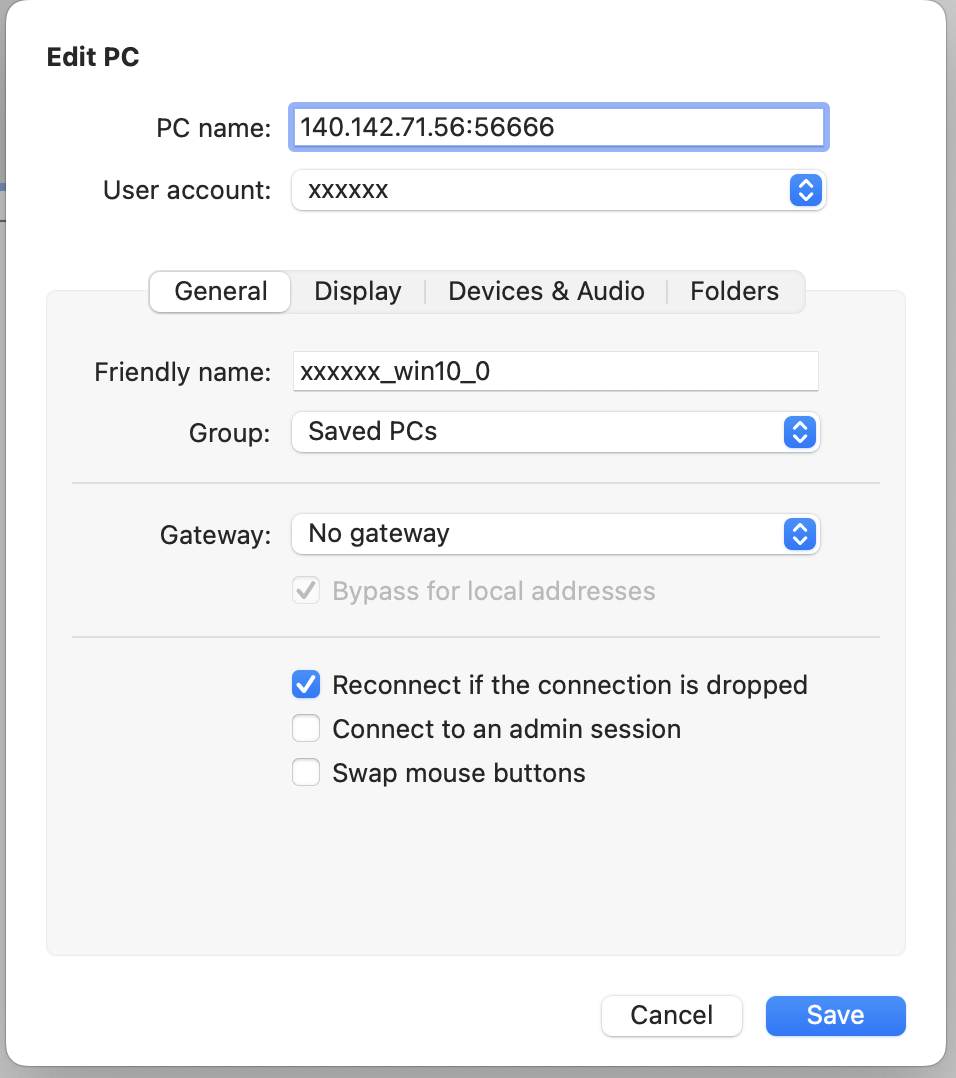
If Microsoft Remote Desktop returns error 0x4 or 0x204 after you click "Connect", it may be that the password you saved was not correctly entered. You can change that by clicking on the pencil icon for the PC, and changing the "User Account" dropdown box to "Ask when required", save it, and connect again.
The correct password might still be on the clipboard. If not, it could be in the large messagebox that informs you how to connect using Microsoft Remote Desktop (near the end of the long message).
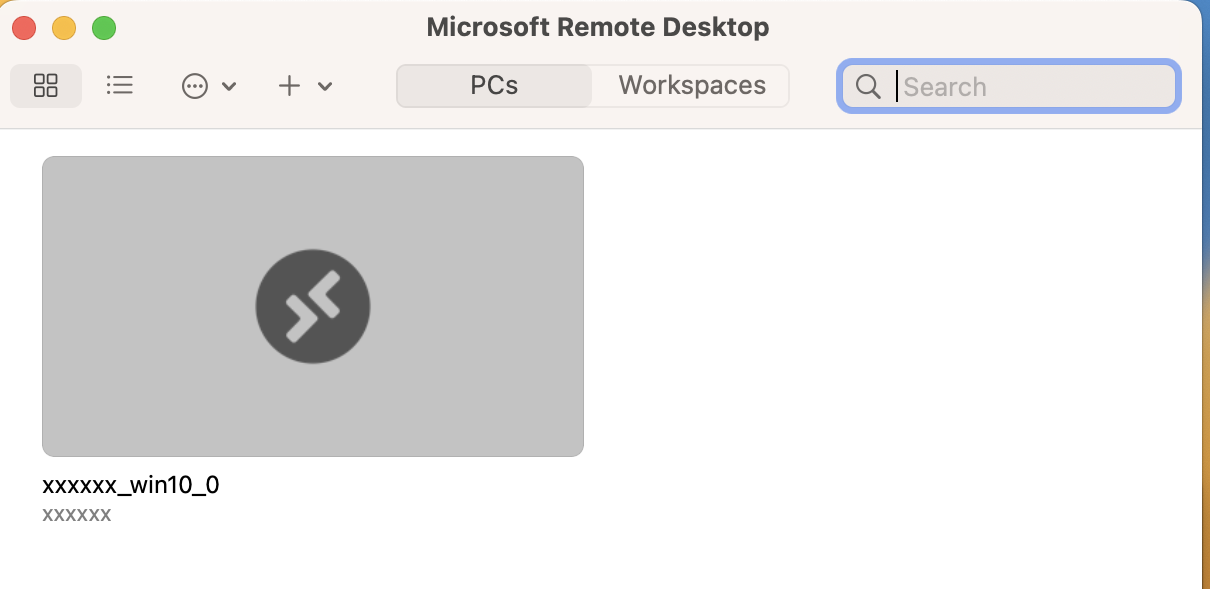
Here are some screenshots that may help:
- Microsoft Remote Desktop after importing the xxxxxx_win10_0.rdp file:
- Show the icons by hovering the mouse/trackpad pointer over the PC:
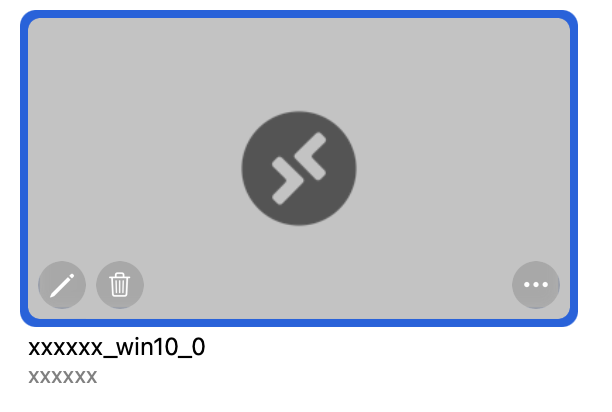
- The pencil icon highlighted:

- The "Edit PC" box resulting from clicking on the pencil icon:
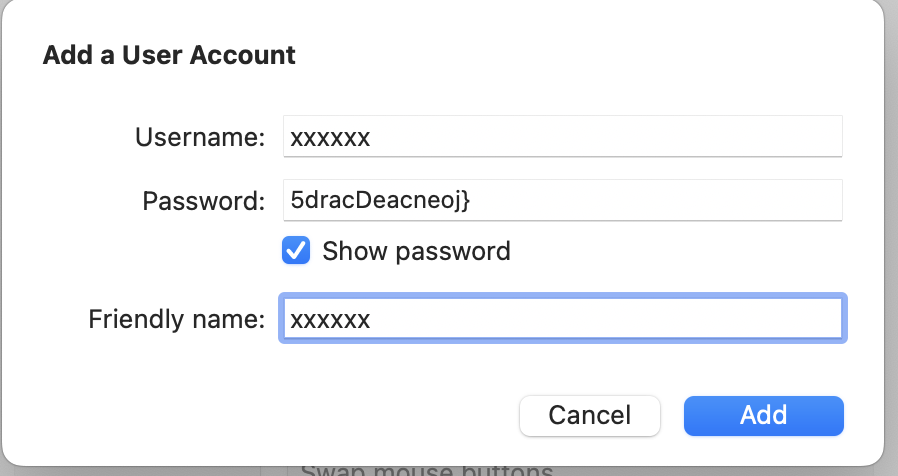
- After clicking on the "User account" name box, you will see choices,
with the "Add User Account..." one highlighted here to click on:
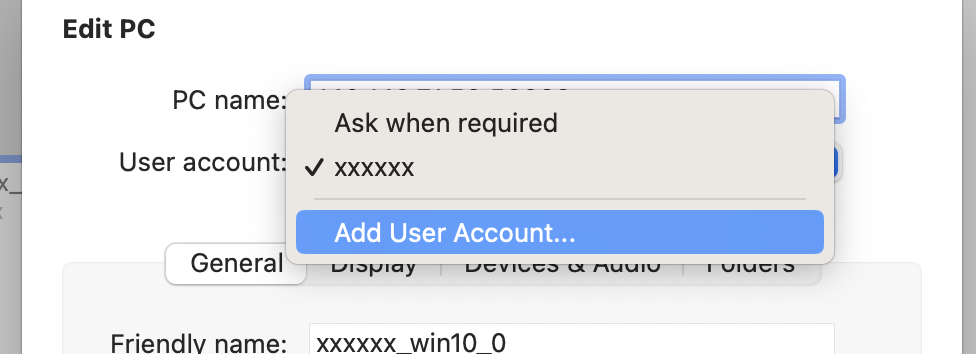
- Here is the user account filled out, with the name to use. Usually,
that name is your UW Net ID, but for team accounts, it will be the
team account. The password was pasted from the clipboard.
Normally, you use the same "Friendly Name" as the "Username" to make it easier. However, sometimes you need to differentiate between two password for the same user account, so choose a friendly name that reflects which user and password combination this is. Here we show only the normal case:
As a last resort, you can copy the password from the VCL file saved in your home directory. The name of the VCL file is likely of the form ".vcl.uwnetid", where "uwnetid" is your UW Net Id. For a team account, it is the team account name (starts with an underscore). Consequently, for my UW Net Id ("srondeau"), the VCL file name would be ".vcl.srondeau". From a terminal window, one can show the contents of a file in the home directory as follows (for example):
cat ~/.vcl.srondeau
In the first line of the VCL file is the password you need, between the single quotes. Copy that to the clipboard (with command-C) and then paste it where needed when defining a new user account entry in the PC (pencil icon, click on dropdown box, click on Add User Account...). In my case, I would provide srondeau as the user name (from first line of the VCL file), and paste the password in the password field, showing the password field as a means of double-checking it. Give it a "Friendly Name" that is the same as an existing user name, and the password replaces the existing password when you "Add" it, and then "Save" the updated PC information.
- Microsoft Remote Desktop after importing the xxxxxx_win10_0.rdp file:
- manage_vc.exe has a virus or is quarantined
This is likely a false positive from your anti-virus tool. manage_vc was deemed to be free from viruses, according to Sophos, the UW's choice for antivirus software.
manage_vc is written in Python and compiled into an executable file. Antivirus software generally use signatures to detect malware. Since AutoIT Script is a general-purpose language with the ability to change the Windows environment, it is used by some malware authors. Another malware-detection technique is to use heuristics to detect behavior that might indicate the presence of malware. Either a signature incorrectly identified manage_vc.exe to be malware, or some heuristic determined that it was suspect.
The default behavior of antivirus software is usually to "quarantine" the file, which makes it not-executable and may even move it to a different location. Since false positives are fairly common, antivirus software often give you the ability to allow a file deemed as malware to be an exception — to "whitelist" the file.
Alternatively, you could install Sophos. Since Sophos doesn't consider manage_vc.exe to be malware, you could simply download and unzip manage_vc_mac.zip and be able to use manage_vc.exe.
- Can't ping cssgate.insttech.washington.edu
Even if you can't ping it, execution continues after you click OK, so you may still be able to retrieve the VCL information file.
- You aren't connected to the network.
Double-check your network connections... try manually pinging google.com in a cmd shell:
ping google.comIf that works, ping cssgate:
ping cssgate.insttech.washington.edu - You are using IPv6 instead of IPv4 addresses.
Check by using ifconfig en0 in a Terminal window. If there is an inet line with a valid IPv4 address, then that will likely be used. Use of any IPv6 address is untested.
- You have an old version of manage_vc.
Check the version number — it should be later than 4.0. If not, re-download and unzip manage_vc_mac.zip.
- You aren't connected to the network.
- Can't find scp program
Change the manage_vc.ini file to provide the correct path to the scp program. It should be /usr/bin/scp in MacOS.
- Can't find ssh program
Change the manage_vc.ini file to provide the correct path to the ssh program. It should be /usr/bin/ssh in MacOS.
- VM's desktop size is too small
Change the manage_vc.ini file to provide the desired desktop width and height. For example, to change from default 1024x768 desktop to 1280x1024, this .ini section information should be present:
[desktop]
width = 1280
height = 1024
You will need to exit manage_vc, then start it again for the .ini file change to take effect when you click on the Connect button and follow the instructions provided.
You may also need to edit your Microsoft Remote Desktop settings for the PC whose display you want to change. Change the appropriate values in the Display tab for Resolution, and save the new settings.
- VM's desktop is not full-screen
Change the manage_vc.ini file to provide the desired desktop "screen mode id". For fullscreen, this .ini section information must be present:
[desktop]
mode = 2
In Microsoft Remote Desktop for the desired PC, you may also want to check the box for "Display/Resolution/Start session in full screen" and/or the "Resolution" values, then save the settings, as changing to full screen does not scale anything or change the resolution.
You will need to exit manage_vc, then start it again for the .ini file change to take effect when you click on the Connect button and follow the instructions provided.
- Can't find ... (file name with .vcl in it)
You may not have successfully contacted cssgate to download the VCL information file. It could be that your IP address is blocked; contact SET lab staff with your IP address" from this web page for help.
- Access is not allowed for ... (file name with .vcl in it)
You do not have write access to that file in your home directory.
- Unable to open file ... (file name with .vcl in it)
There was some error with opening that file.
- The list of VMs is different from what was expected.
You may be referencing an old set of VMs from a previous class. In some cases, if you should be using a team account, you may have omitted the team account name after your UW Net Id when prompted for a user name.
- Connection refused: FATAL NETWORK ERROR
There could be a variety of problems causing this, but the most common one is that the host computer (where the VM is running) is blocking your IP address; contact SET lab staff with your IP address" from this web page for help.
- Store key in cache? (y/n)
You normally answer:
y
to this prompt.
Troubleshooting commands
- Command does not work/execute.
In manage_vc, commands run by "Do cmd:" now (since 2.57) run synchronously, meaning that if you don't close the command window for the previous command, the next "Do cmd:" won't work. Make sure you close all command shell windows from previous commands (look at your Windows Task Bar) before trying to execute another one.
- screenshot: No information returned for screenshot.
Sometimes a long-running screenshot web server gets stuck, and needs to be stopped. This can be detected by the above message in manage_vc or the lack of a screenshot web page URL being shown to you. In either case, run this command (people NOT using manage_vc do this after "ssh uwnetid@ipaddr"):
screenshot vmname stopweb
where "vmname" is the name of any VM you manage (one web server created for all VMs).
- scp or ssh: authenticity of host can't be established
The first time you try to connect to a host with either scp or ssh, you may receive this message, which also asks if you want to continue. While there are man-in-the-middle (MITM) cyberattacks of which you should be wary, most of the time you can simply answer yes and safely continue. This message is stating that scp/ssh doesn't know the host, and its key has never been saved on your computer, so it isn't sure if it should continue. This can also happen if the host key was re-generated; e.g., when the host computer is upgraded or changes its operating system.
Unfortunately, there is no indication if this is a MITM attack, so you are still taking a small risk, but SET Lab staff advice is to accept this the first time it happens on your computer, but ask SET Lab staff if it happens again from the same computer.
- Guest OS feature/service does not work
There can be many reasons why something that you expect to be working on the guest OS (e.g., Windows, Ubuntu) running inside the virtual machine is not working. The feature or service may not be installed, started, or configured correctly, or it may be blocked by a firewall. In addition, not all network services are available as expected based on the virtual network used; e.g., the Network Address Translation (NAT) networking method will not allow guest ports to be used unless explicitly mapped to host ports.
However, more fundamentally, you may not realize that the VM is not running, in which case the guest OS is not running. That's the first thing you should check via manage_vc's "Show State" button or the ssh command sent to the host. For example, using an ubuntu VM on host 140.142.71.5:
ssh srondeau@140.142.71.5 vcl_status ubuntu
If it is "running", then something else may be wrong (see first paragraph). If it is not, you will need to start the VM before you try to use the VM, to make sure the guest OS is running.
Common reasons that a VM may not be running:
- you or a team member may have shutdown or powered off the VM
- a power outage that forced a restart of the host that runs the VM
- SET Lab staff may have put your VM into a "saved" state to perform maintenance on the host
- the host may have been instructed to save resources, which means that if there is no input activity that is detected in a predefined amount of time, the host will shutdown or save the state of the VM.
In nearly all cases, one should be able to start the VM again and access the guest OS's features.
Troubleshooting Networking
You should first ensure that the VM has started and the guest OS is fully operational. The next thing to check is the IP address -- can you connect to it? Try:
ping ipaddr
where "ipaddr" is the host or VM's IP address. If the connection times out, perhaps the IP address is in a semi-private/private subnet only accessible from the VPN, in which case you need to make sure you are connected to the VPN, and ping the IP address again afterwards.
Another possibility is your port number is incorrect; often it is set to a non-default port by SET lab staff to make it more difficult for internet attackers to find it; contact SET lab staff for information.
It may be possible that the remote desktop service is not working properly if you can determine, by utilizing the screenshot command, that the guest operating system is up. The guest operating system's firewall might be blocking it, or the service has not been started or has failed. Please contact SET lab staff to help with such problems.
You may need to stop Husky OnNet, then start it again to allow the connection to go through.
The host on which your VM resides may be using a private IP address, which is not accessible directly from off-campus. Use the Husky OnNet VPN to access the campus network from off-campus, prior to using any VM IP-related resources.
Change Log
| 26 Jan 2023 | Added error code '0x204' to troubleshooting manage_vc for Mac item concerning "Error code 0x4" |
| 11 Jan 2023 | Added troubleshooting manage_vc for Windows item concerning a "Traceback" message caused by an unhandled exception and one for "access denied". |
| 6 Jan 2023 | Changed last paragraph of "Error 0x4 when connecting to VM's display" to reflect that "adding" a password to an existing "user" and providing the same "friendly name" as "user" will update the password for the user. |
| 25 Oct 2022 | Provided xfreerdp example for Linux use. |
| 10 Oct 2022 | Added troubleshooting instructions for what to do when the Alert information box shows up using a Mac. |
| 3 Oct 2022 | Added instructions to use manage_vc for Linux, and restored section "Methods to Display and Interact with VM". Also, re-arranged and clarified the table of contents at top. |
| 12 Sep 2022 | Added instructions to use manage_vc for MacOS and corresponding Troubleshooting section. |
| 21 Jun 2022 | Added "Guest OS feature/service does not work" in the Troubleshooting Commands section. |
| 15 Apr 2022 | In Mac instructions, added Microsoft Remote Desktop Connection-specific field names in the examples, and added screenshot with it. |
| 13 Oct 2021 | Added troubleshooting commands section topic on scp/ssh "authenticity of host" message. |
| 30 Sep 2021 | Added troubleshooting manage_vc section on changing to fullscreen mode. |
| 29 Jul 2021 | Added troubleshooting manage_vc section on resolving small desktop size on connect, and removed onload alert. |
| 2 Apr 2021 | Added troubleshooting manage_vc section on resolving "internal error" on connect. |
| 23 Dec 2020 | Revised onload alert to highlight January 2021 changes, noted special case where .vcl file contains multiple vcl user/host and guest information lines due to multiple courses for which the student has VMs, and updating opt-out documentation to state when students can opt-out. |
| 7 Dec 2020 | Added onload alert to highlight January 2021 changes. |
| 20 Oct 2020 | Revised Mac section for using VRDP information from .vcl file. |
| 25 Sep 2020 | Added two more plink/pscp-related "Troubleshooting manage_vc" items. |
| 24 Sep 2020 | Added two plink-related "Troubleshooting manage_vc" items. |
| 31 Aug 2020 | Added "Troubleshooting commands" section and content. |
| 26 Aug 2020 | Provided better instructions to get NIC information, and for subnets only available from Husky OnNet VPN. |
| 25 Aug 2020 | Provided better instructions for using .vcl file "PORT Information". |
| 24 Aug 2020 | Provided troubleshooting instructions for Command in "Do cmd:" dropdown box does not work/execute. |
| 5 Aug 2020 | Added new ways to connect and interact with the VM's guest operating system. |
| 2 Apr 2020 | Provided troubleshooting instructions when "FATAL NETWORK ERROR" occurs. |
| 17 Mar 2020 | Provided instructions for how to connect to a remote display from a Mac. |
| 11 Mar 2020 | Added prerequisite instructions for using UW Husky OnNet VPN to connect to on-campus computers from off-campus. Added table of contents. |
| 11 Oct 2019 | Added logging into cssgate before using manage_vc to avoid problems getting the VCL information file, per Chuck Costarella's suggestion. |
| 20 Aug 2019 | Added .NET Framework 3.5 installation information. |
| 7 Aug 2019 | Added troubleshooting item "manage_vc.exe has a virus or is quarantined" |
| 11 Apr 2019 | Added troubleshooting item "Using Husky OnNet: Connection timed out" |
| 23 Oct 2018 | Added troubleshooting item "Connection refused: FATAL NETWORK ERROR" |
| 19 Jun 2018 | Fixed broken link to Microsoft Remote Desktop client for Mac. |
| 10 May 2017 | Added documentation for paste command. |
| 14 Sep 2016 | Changed references to INSTTECH password to MyUW password. |
| 30 Jun 2016 | Removed pre-requisite for downloading putty, since it has been included in the .zip file for a while now. Included Mac OS X section on "Issue commands to the VM". |
| 14 Jan 2016 | Updated Mac OS X instructions |
| 30 Sep 2014 | Added "Troubleshooting" section |
| 2 Apr 2014 | Added info on using Ctrl-Alt-End to send Ctrl-Alt-Del to virtual computer |
| 18 Aug 2013 | Attempted to clarify instructions |
| 24 Jan 2013 | Updated instructions for Mac OS X users to also use CoRD |
| 15 Jan 2013 | Provided instructions for Mac OS X users |
| 18 Oct 2012 | Provided instructions on what to change for PuTTY installed on a Windows 64-bit system |
| 20 Dec 2011 | Clarified which version of PuTTY to download, added team account and virtual computer start instructions |
| 19 Nov 2010 | Original document |
Hours | Support Information | News |
Policies | Emergencies